

Post-processing is the last step in the additive manufacturing workflow, transforming rough prints into beautiful, functional, and saleable products that accurately reflect their original designs.
Any work performed on a print after the 3D printing process is complete is part of post-processing. Examples include curing SLA parts with UV light to achieve their final material properties and sanding FFF parts to reduce visible layer lines.
Some 3D printing post-processing steps are unique to specific technologies, and the extent of processing depends on the nature of the print. The material/filament type also plays a critical role in the techniques required.
Post-processing can be necessary for aesthetics or to ensure required strength properties. In some cases, post-processing is required to join or bond parts together and create assemblies.
This article runs through the post-processing techniques you will most likely encounter in your 3D printing journey with best practices for the best finish.
Let’s jump in!
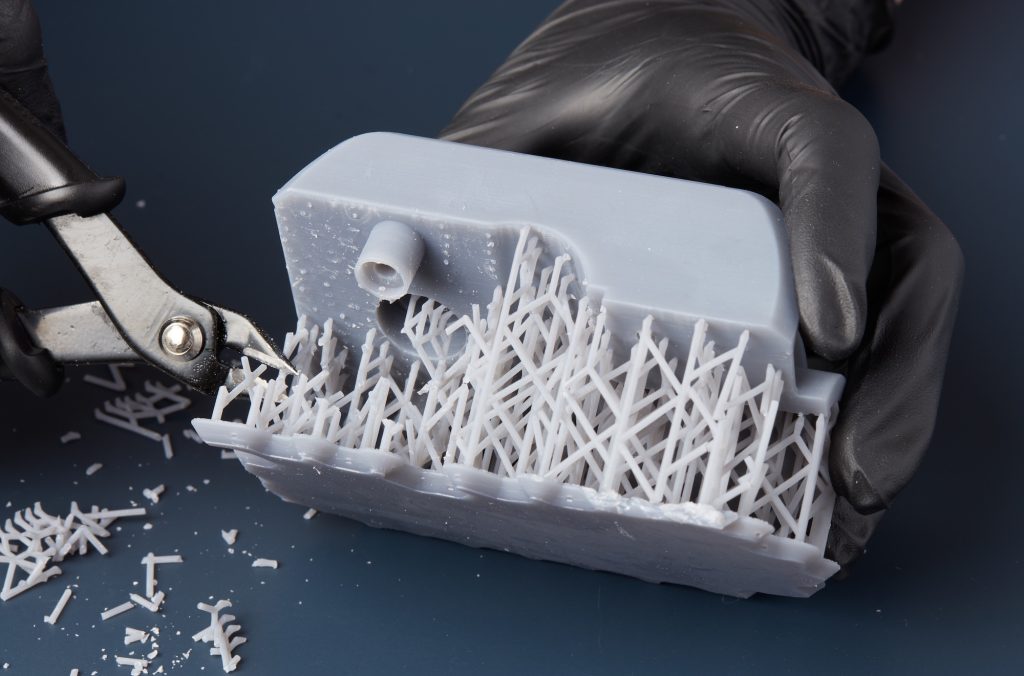
Support removal

Support removal is a fundamental post-processing step relevant to SLA and FFF 3D printers when parts are printed with supports.
The removal of support material is not usually difficult, although if supports are in small tight corners or other problematic areas, you will need a specialist tool.
Support materials come in two distinct types: removable and soluble. Removable supports are built with the same material as the primary part or with a breakaway material like, while soluble supports are usually BVOH, PVA or HIPS.
You can remove supports mechanically with pliers, cutters, or a craft knife. You can snap supports away if you have a Formlabs printer with LFS technology.
Dual-extruder 3D printers are usually compatible with soluble support materials, which are easily removable with the immersion of the part in water or another appropriate liquid, such as D-limonene for HIPS, leaving no remaining marks or dregs.
Best practices
Ensure the support material is fully compatible with the build material and design efficient, easily removable support structures. Software like Cura and PreForm can generate supports for you, making life easier during removal.
UV curing

UV or post-curing is relevant to photopolymer 3D printing techniques, including SLA, LDP, and LCD. It involves exposing green parts (pre-cured parts) to a controlled stream of UV light and heat to cure the plastic and transform its mechanical characteristics. The temperature and duration of a curing cycle is material specific.
In SLA models, UV light exposure triggers additional chemical bonds known as cross-links to form within a printed part, making the material stronger and stiffer.
As more and more cross-links are created, the resin slightly densifies, and the entire part shrinks – an expected outcome of resin-based 3D printing.
Formlabs’ PreForm software can accurately compensate for this shrinkage and guarantee an accurate output, maintaining precision in your models to ensure your fully cured parts have the correct dimensional accuracy.
Some resins, such as Formlabs High Temperature and Rigid 10K resins, also benefit from an additional Thermal Cure in an oven to achieve their maximum heat resistance.
Best practices
Specific resins and materials cure best with certain wavelength ranges and temperature settings. For example, Formlabs materials cure best with 405 nm light. You must consider the part geometry and intended applications to meet tight tolerances.
Sanding
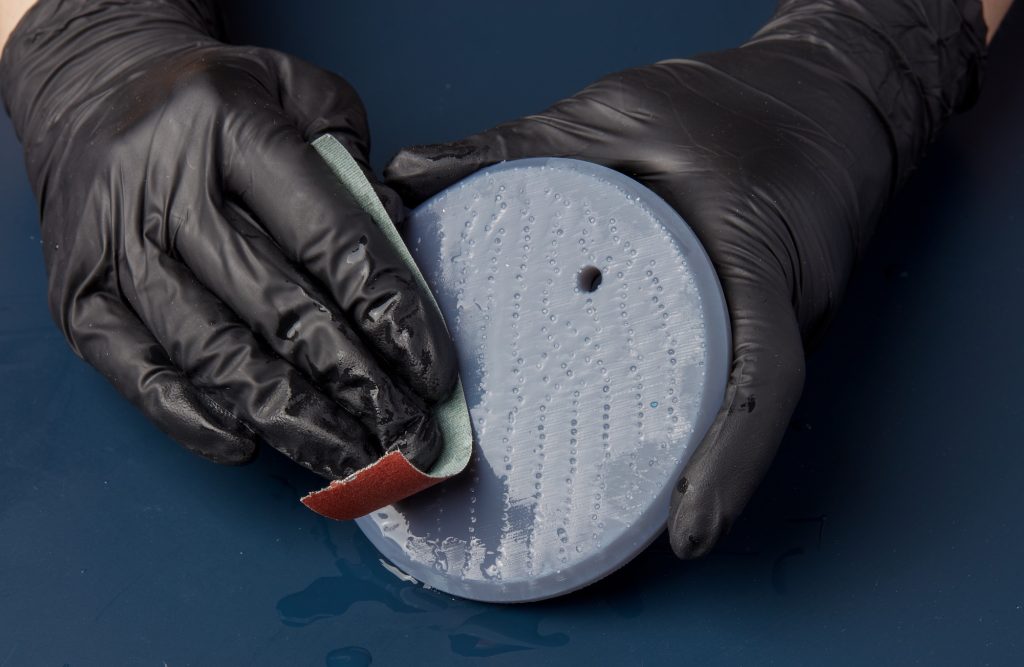
Sanding is a helpful post-processing step for eliminating or reducing visible layer lines to smooth prints and preparing them for coatings, moulding, or assembly. It takes place after the removal of rafts and supports, helping mask removal marks.
This step involves using low-grit sandpaper (150 – 400) and gradually working to finer paper (up to 2,000). Sand lightly in circular motions with a light layer of water to absorb extra heat and ensure a high-quality result.
Doing this will ensure that any blemishes or ridges left after the removal of supports are minimal for a finished look.
Sanding is relevant to FFF, metal FFF, and SLA models, especially rigid and semi-rigid materials.
While you can sand TPU and other soft materials, you must freeze the model first to stiffen the material and make it workable.
Best practices
Surfaces printed on the Z axis have the smoothest surface finish, requiring less sanding for a perfect result. Take extra time with X and Y axes surfaces, using various grits to reduce, blend, and eliminate layer lines.
Polishing

Polishing the surface of a 3D print will give you a glossy finish. You can do it easily with simple items from any hardware store – a microfiber cloth and a plastic polisher. You can use a handheld Dremel tool to make the process even easier.
Before polishing, your 3D-printed part will need to be sanded correctly – working through the different grades of sandpaper until you reach the finest grade available. Once the sanding is complete, rinse the parts to ensure no particles are left behind.
When using a cloth to polish the 3D printed part, apply the polisher and move the cloth in a circular motion until you’re happy with the result. The handheld Dremel tool will take care of much of the work for larger projects.
Best practices
Polishing can compromise the dimensional accuracy of parts, so if you are working with tight tolerances, you should compensate for them in software. For a professional finish, use a decorative or automotive polishing compound.
Vapour smoothing
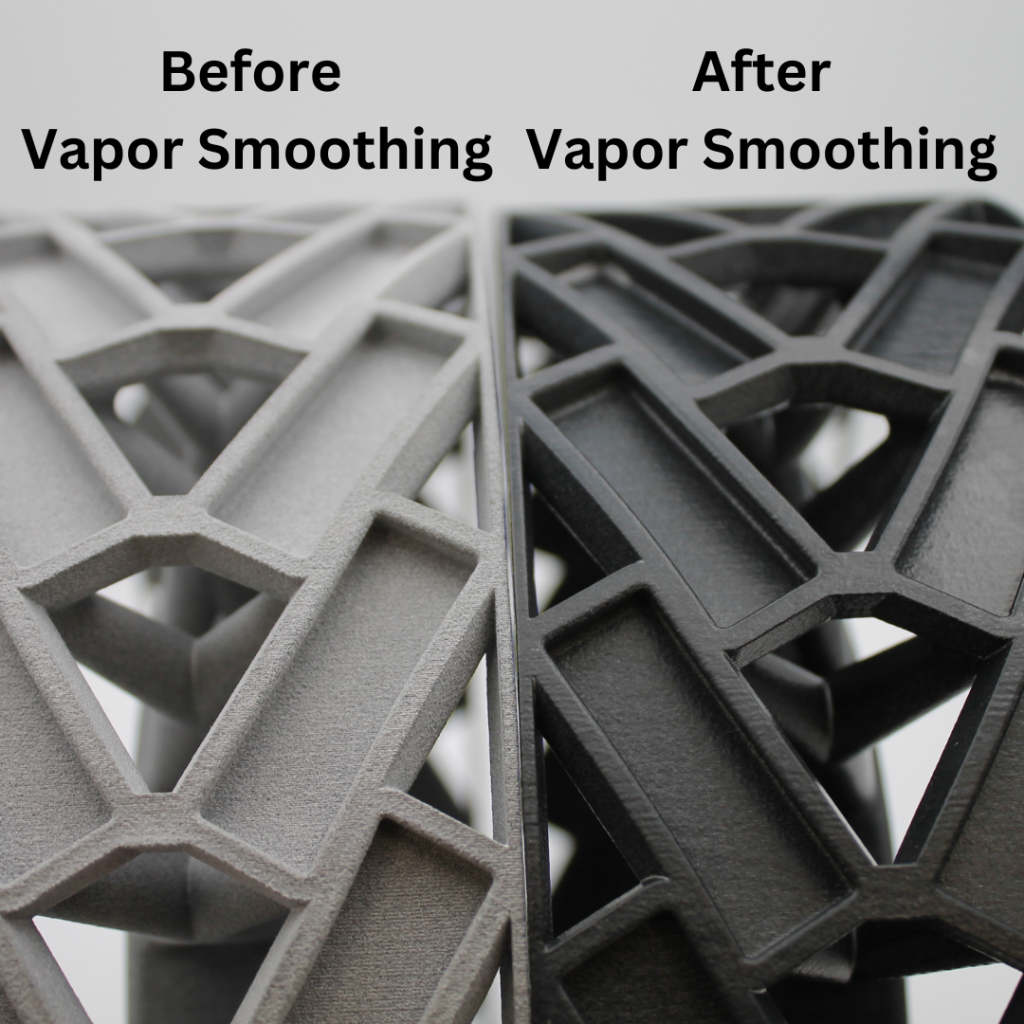
Vapour smoothing is another technique for reducing or eliminating visible layer lines. It exposes parts to a vaporised solvent that smooths the surface without adding or removing any material, giving them an injection-moulded look.
With the AMT PostPro, parts are suspended in a chamber and exposed to a solvent vapour compatible with the print material. The vapour condenses on the parts, smoothing the surface polymers without mechanical action.
The benefits of vapour smoothing include a uniform and sealed surface, no extra coatings, and no losses in geometry, weight, or material volume.
Best practices
While vapour smoothing is compatible with most 3D-printed polymers and elastomers, it requires careful solvent dosing, exposure times, and temperature settings. We recommend buying an automated workstation like the AMT PostPro.
Gluing
Gluing your 3D prints is a crucial step when attempting to join and assemble various sections of a model, or if you need to construct an item too big or too complex to print from a single piece in one printing session.
Epoxy is popular for gluing 3D prints built from ABS, PLA, PC, and PETG. Other non-epoxy glues such as Cyanoacrylate glues, commonly referred to as “superglues”, are suitable for gluing some thinner pieces together.
The downside to gluing is the bond is only as strong as the adhesive, so you must ensure the glue you use can withstand relevant stresses.
Best practices
Gluing can get messy, so always wear suitable gloves, and protect surfaces. You can glue most plastics together with a suitable adhesive or bonding agent. Still, you should always test the glue on scrap material before applying it to the model/assembly you are building.
Welding
Welding refers to using acetone to melt a layer of ABS and join it to another ABS section or part, effectively creating a stronger joint than glue.
Acetone can create a robust and intricate joint between two ABS parts by impacting the surface of each part. Use a brush to apply the acetone solution and ensure that the parts meet on a flat and even surface so that the holding power between the components can be greater than any glue, maximising performance.
Acetone can also infiltrate the sections between parts, giving you a way to seal joints and create solid ABS components. It can eliminate visible layer lines by dissolving the first plastic layer for a smooth, clean surface.
Best practices
Overdoing it with acetone is easy and creates an uneven surface finish. You can maximise results by ensuring parts are clean and free of debris or contaminants, using fresh acetone, and using a uniform overlaying technique for an even weld.
Priming and painting
Priming and painting can transform your 3D prints into final products suitable for display and retail.
Priming prepares a surface for painting, creating a base layer ahead of the final application of paint. However, some solvent-based paints act as the first coat’s primer, which can considerably reduce post-processing times.
Spray paint is most suitable because it goes well with plastic, creating a flat, uniform finish, and can penetrate hard-to-reach areas. Brushing is better for small details, surface texturing, and painting letters and graphics.
Best practices
Sanding with low- and then medium-grit sandpaper will help to eliminate layer lines and make the surface smooth for painting. Use compressed air to remove lint and debris from your model before painting and spray thin, even coats for consistent coverage.
Find out more
To find out more about post-processing, call us on 01765 694 007 or email [email protected].
